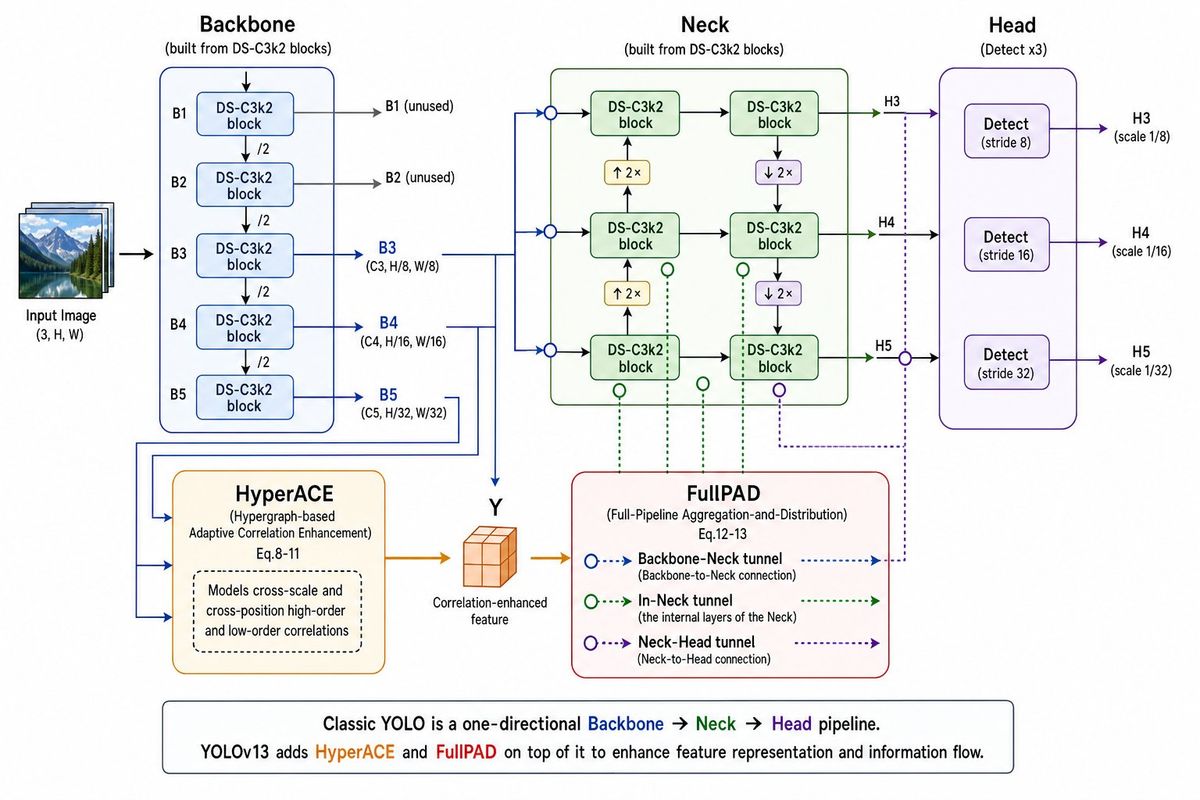
YOLOv13 架构图
Prompt
Goal: Create a clean technical architecture diagram explaining {argument name="model name" default="YOLOv13"} as a one-page educational slide, showing how an input image flows through Backbone, HyperACE, Neck, FullPAD, and Head detection outputs.

Canvas: Wide 16:9 landscape infographic on a white background, crisp vector style, thin colored outlines, rounded rectangles, arrowed connectors, and readable sans-serif text. Use a left-to-right pipeline with supplementary modules below the main path.

Layout: Start at far left with a small stacked thumbnail illustration labeled “Input Image (3, H, W)”, then an arrow into a large blue Backbone panel. Place the green Neck panel in the upper center, the purple Head panel on the right, HyperACE in the lower left-center, FullPAD in the lower center-right, and a boxed explanatory caption along the bottom.

Main pipeline sections and exact element counts:
- 1 Input Image stack at far left, shown as layered landscape photos.
- 1 Backbone panel titled “Backbone” with subtitle “(built from DS-C3k2 blocks)”. Inside it, show exactly 5 vertically stacked DS-C3k2 block boxes labeled B1, B2, B3, B4, B5. Put “/2” downsampling markers between each adjacent block, for exactly 4 downsampling labels. Add side output arrows: B1 and B2 go right and are labeled “B1 (unused)” and “B2 (unused)”; B3, B4, and B5 go right in blue and are labeled “B3 (C3, H/8, W/8)”, “B4 (C4, H/16, W/16)”, and “B5 (C5, H/32, W/32)”.
- 1 HyperACE module below the Backbone, orange outline, titled “HyperACE” with subtitle “(Hypergraph-based Adaptive Correlation Enhancement) Eq.8-11”. Inside it, include one dashed rounded note box saying “Models cross-scale and cross-position high-order and low-order correlations”. Blue lines from B3/B4/B5 feed into HyperACE. HyperACE outputs an orange arrow to a small orange 3D cube labeled “Y” and “Correlation-enhanced feature”.
- 1 Neck panel in the upper center, green outline, titled “Neck” with subtitle “(built from DS-C3k2 blocks)”. Inside it show exactly 6 DS-C3k2 block boxes arranged in a 2-column by 3-row grid. Use black arrows between blocks, with exactly 2 yellow upsample boxes labeled “↑ 2×” and exactly 2 purple downsample boxes labeled “↓ 2×”. Include 3 blue circular input junctions on the left edge of the Neck and 3 green/purple circular tunnel markers below or beside the grid.
- 1 FullPAD legend module below the Neck, red outline, titled “FullPAD” with subtitle “(Full-Pipeline Aggregation-and-Distribution) Eq.12-13”. Show exactly 3 legend rows: “Backbone–Neck tunnel (Backbone-to-Neck connection)” using blue dotted arrows and blue hollow circles; “In-Neck tunnel (the internal layers of the Neck)” using green dotted arrows and green hollow circles; “Neck–Head tunnel (Neck-to-Head connection)” using purple dotted arrows and purple hollow circles. Connect the cube feature into FullPAD with an orange arrow, and draw dotted blue/green/purple tunnel routes upward and rightward to the Neck and Head.
- 1 Head panel on the right, purple outline, titled “Head” with subtitle “(Detect x3)”. Inside it show exactly 3 vertically stacked Detect boxes: “Detect (stride 8)”, “Detect (stride 16)”, and “Detect (stride 32)”. Each receives one arrow from the Neck and outputs to the right as H3, H4, H5 with labels “H3 (scale 1/8)”, “H4 (scale 1/16)”, and “H5 (scale 1/32)”.

Color coding: Backbone lines and panel in blue, Neck in green, Head in purple, HyperACE in orange, FullPAD outline in red. Main arrows are solid; FullPAD tunnels are dotted/dashed with hollow circular nodes. Use subtle pastel fills for module boxes.

Bottom caption: Add one wide rounded rectangle spanning the lower width. Text: “Classic YOLO is a one-directional Backbone → Neck → Head pipeline.” Then on the next line: “{argument name="model name" default="YOLOv13"} adds HyperACE and FullPAD on top of it to enhance feature representation and information flow.” Color the words Backbone blue, Neck green, Head purple, HyperACE orange, and FullPAD red.

Constraints: Keep all labels legible, align sections neatly, preserve the exact counts of blocks and detect heads, avoid extra modules, avoid photorealism except for the small input image thumbnail, and do not add a watermark.- Category
- Charts & Infographics
- Model
- GPT Image 2
- Creator
- Keigo Nakano
- Source ID
- 25063
- Published
- Jun 10, 2026
Views4